Project6Fall14
Contents |
Project 6: Silver Water
[THIS PROJECT IS UNDER CONSTRUCTION. PLEASE COME BACK LATER.]
This project is on Bezier patches, texturing, and environment mapping with a GLSL shader program. The goal is to create a Bezier patch, make it resemble a water surface with small waves, then put it in a textured environment cube and render its surface with environment mapping.
It is due on Friday, December 5th at 3:30pm and will be discussed in CSB 001 on Monday, December 1st at 5pm.
1. Make a Bezier Patch
2. Animate the Patch
3. Add an Environment
4. Use Environment Mapping
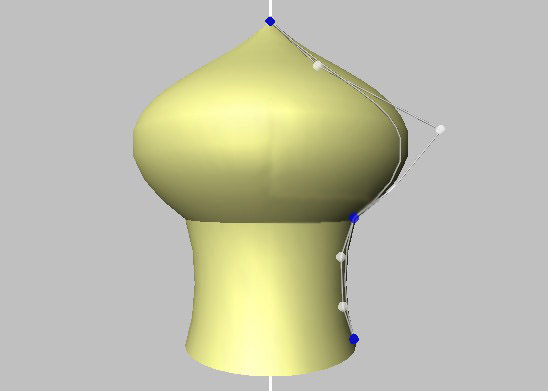
<-- A surface of revolution is an object that is rotationally symmetrical around a central axis. The following picture shows approximately what is expected.
a) Start by drawing a GL_LINE from top to bottom in the center of your OpenGL window. This is your axis of symmetry. (5 points)
b) Generate control points for two connected cubic Bezier curves, and display the control points as GL_POINTS - you can create larger points with the glPointSize command. (If you max out the point size, use glutSolidSphere). All control points need to be located to the right of the axis of symmetry. Use different colors for the interpolating control points and the approximating ones. (5 points)
c) Connect the control points with straight lines. (5 points)
d) Draw the cubic Bezier curves the control points describe in a different color than the lines: Evaluate at least 20 sample points (this needs to be a const value in your code that can be changed easily) along each Bezier curve segment. The two curves need to be C0 continuous at the junction point, but higher level continuity is not required for now. (10 points)
e) Calculate the vertices for the surface of revolution by rotating the Bezier curve around the axis of symmetry in steps of at most 10 degrees (make this a const value that can be changed easily as well). (10 points)
f) Connect the vertices with GL_QUADS in counter-clockwise order to form a surface, and calculate (normalized!) normals. Use a perfect bright white (glColor3f(1,1,1)) for the color of the GL_QUADS. (10 points)
Tip: You can compute normals as follows: Given the Bezier curve (x(t),y(t),0) in the x/y plane, you first compute the tangent vector (x'(t),y'(t),0). The corresponding 3D normal vector is then (-y'(t),x'(t),0), which you rotate around the y axis similar to the vertices. Don't forget to normalize the normal vectors.
g) Enable at least one directional light source and position it so that it nicely illuminates the object. Use a light direction from above and behind the camera and slightly offset to the left. (5 points)
h) Allow the user to move the control points with the mouse by clicking on them with the left mouse button and dragging them to a new location. Don't allow moving them across the axis of symmetry. Regenerate the surface of revolution for the new set of control points every time the mouse button is released. (10 points)
2. Texture Your Object (40 Points)
Take a photograph or find one on-line and drape it onto your surface of revolution. It needs to stretch across its entire surface area, from top to bottom and all the way around, but only on the outside, not the inside of the object.
To familiarize yourself with texture mapping in OpenGL, we provide a sample program, which loads a PPM file and uses it as a texture for a quad. You can cut and paste code from it into your own project.
Follow these steps:
a) Convert your photograph to the PPM format. The free image processing tool IrfanView will do this for you. (5 points)
b) Read the PPM image and turn it into an OpenGL texture. You can use the code from the above referenced sample program. (10 points)
c) Calculate texture coordinates for each vertex and set them with glTexCoord2f. Make sure the texture gets mapped right side up. The image needs to stretch to the entire height of the object and go all the way around it - this means that the texture coordinates at each vertex will need to be fractions of 1. (10 points)
d) Render the surface of revolution with the texture. (5 points)
e) Add support for the 't' key to toggle between the object with and without the texture. (5 points)
f) Make sure your control points still work as before and allow changing the shape of the object. (5 points)
Tips:
- Use the following settings for your texture after your first glBindTexture for correct lighting and filtering settings:
  // Make sure no bytes are padded:
  glPixelStorei(GL_UNPACK_ALIGNMENT, 1);

  // Select GL_MODULATE to mix texture with quad color for shading:
  glTexEnvf(GL_TEXTURE_ENV, GL_TEXTURE_ENV_MODE, GL_MODULATE);

  // Use bilinear interpolation:
  glTexParameterf(GL_TEXTURE_2D, GL_TEXTURE_MIN_FILTER, GL_LINEAR);
  glTexParameterf(GL_TEXTURE_2D, GL_TEXTURE_MAG_FILTER, GL_LINEAR);
- For the texture coordinates u/v, you can use the curve parameter t at each vertex as the u parameter. The v parameter at each vertex is proportional to the rotation angle around the y axis you applied to get the vertex.
-->
