Project2S18
Contents |
Levels of Immersion
In this project we are going to explore different levels of immersion with the Oculus Rift. Like in project 1, we're going to use the Oculus SDK, OpenGL and C++.
Starter Code
We recommend starting either with your project 1 code, or going back to the starter code. It's very compact but yet uses most of the API functions you will need.
Here is the minimal example .cpp file with comments on where the hooks are for the various functions required for this homework project. Note that this file has a main() function, so that it can be built as a console application, and will start up with a console window into which debug messages can be printed.
Note:
- The minimal example code uses OGLplus libraries to render the cubes, but you are supposed to replace the rendering handled with OGLplus by your own rendering methods.
Project Description (100 Points)
You need to do the following things:
- Modify the starter code (in which many cubes are rendered) to render just two cubes, one behind another along the user's line of sight. (10 points)
- Use texture mapping to display this calibration image on all faces of both cubes. The image needs to be right side up on the vertical faces, and make sure it's not mirrored. Each cube should be 20cm wide and its closest face should be about 30cm in front of the user. Here is source code to load the PPM file into memory so that you can apply it as a texture. Sample code for texture loading can be found in the OpenVR OpenGL example's function SetupTexturemaps(). (20 points)
- Render this stereo panorama image around the user as a 10m wide sky box with the user at its center. The trick here is to render different textures on the sky box for each eye, which is necessary to achieve a 3D effect. Cycle with the 'X' button between showing the entire scene (both cubes and the stereo sky box), just the sky box in stereo, and just the sky box in mono (i.e., one of the panorama images is rendered to both eyes). (15 points)
- Gradually vary the physical size of both cubes with the left thumb stick left/right. This means changing the size of the cubes from 30cm to smaller or larger values. Pushing down on the thumb stick should reset the cubes to their initial sizes (2 points). Support a range from 0.01m to 0.5m. Make sure the cubes' center points do not move when their size changes (i.e., scale the cubes about their centers) (2 points). (10 points total)
- Cycle between the following four modes with the 'A' button: 3D stereo, mono (the same image rendered on both eyes), left eye only (right eye black), right eye only (left eye black), inverted stereo (left eye image rendered to right eye and vice versa). Regardless of which mode is active, head tracking should work correctly, depending on which mode it's in as described below. (10 points, 2 points per mode)
- Cycle between different head tracking modes with the 'B' button: regular tracking (both position and orientation), orientation only (position frozen to what it just was before the mode was selected), position only (orientation frozen to what it just was), no tracking (position and orientation frozen to what they just were when the user pressed the button). (20 points, 5 points per tracking mode)
- Gradually vary the interocular distance (IOD) with the right thumb stick left/right. Pushing down on the thumb stick should reset the IOD to the default. You'll have to learn about how the Oculus SDK specifies the IOD. They don't just use one number for the separation distance, but each eye has a 3D offset from a central point. Find out what these offsets are in the default case, and modify only their horizontal offsets to change the IOD, leaving the other two offsets untouched. Support an IOD range from -0.1m to +0.3m. (15 points)
Notes:
- Cycling means that each time the respective button is pressed the viewing mode will change from one mode to the next, and eventually back to the first mode.
- The view in the Rift always needs to look like the control window on the screen: the render texture should never shift off the display panels in the Rift.
- In modes that the skybox is rendered in mono, you're still rendering the scene in stereo, but the texture on the skybox is the same for left and right eye.
Notes on Panorama Rendering
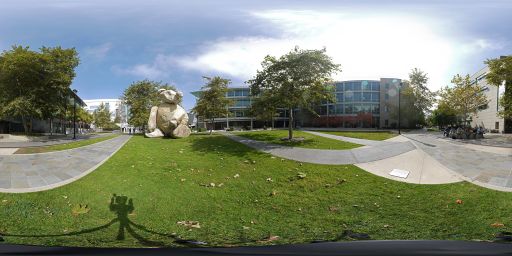
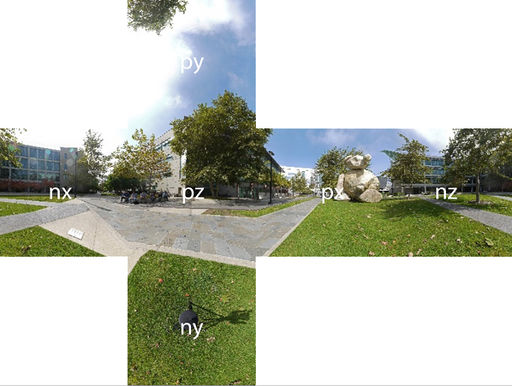
There are six cube map images in PPM format in the ZIP file. Each is 2k x 2k pixels in size. The files are named nx, ny and nz for the negative x, y and z axis images. The positive axis files are named px, py and pz. Here is a downsized picture of the panorama image:
And this is how the cube map faces are labeled:
The panorama was shot with camera lenses parallel to one another, so the resulting cube maps will need to be separated by a human eye distance when rendered, i.e., their physical placement needs to be horizontally offset from each other for each eye. Support all of the functions you implemented for the calibration cube also for the sky box (A, B and X buttons, both thumb sticks).
Extra Credit (up to 10 points)
There are four options for extra credit.
- Stereo Image Viewer: Take two regular, non-panoramic photos from an eye distance apart (about 65mm) with a regular camera such as the one in your cell phone. Use the widest angle your camera can be set to, as close to a 90 degree field of view as you can get. Cut the edges off to make the images square and exactly the same size. Modify your texturing code for the cubes so that they support stereo images (showing a different image to each eye). Use your custom images as the textures and render them in stereo so that you see a 3D image on the cube. You may have to make the cube bigger to see a correct stereo image - the size of the image should fill as much of your field of view as the camera's field of view was when it took the images. (5 points)
- Custom Sky Box: Create your own (monoscopic) sky box: borrow a Samsung Gear 360 camera from the media lab, or use your cell phone's panorama function to capture a 360 degree panorama picture (or use Google's StreetView app, which is free for Android and iPhone). Process it into cube maps - this on-line conversion tool can do this for you. Texture the sky box with the resulting textures. Note you'll have to download each of the six textures separately. Make it an alternate option to the Bear image when the 'X' button is pressed. (5 points)
- Super-Rotation: Modify the regular orientation tracking so that it exaggerates horizontal head rotations by a factor of two. This means that starting when the user's head faces straight forward, any rotation to left or right (=heading) is multiplied by two and this new head orientation is used to render the image. Do not modify pitch or roll. In this mode the user will be able to look behind them by just rotating their head by 90 degrees to either side. Get this mode to work with your skybox and calibration cubes, tracking fully on, and correct stereo rendering. (5 points)
- Smoother controller tracking: Render a sphere in the location of your dominant hand's controller location, just like in homework #1. Move your hand around and notice how the sphere follows it. Now push a previously unused controller button to enter 'Smoothing Mode'. In this mode, calculate the moving average over the past n frames' positional tracking values (we won't average over orientation here). Use this averaged position to render the sphere. Allow the user to change the number of frames (n) you're averaging over within a range of 1 to 45 in increments of 1. Notice how with larger values of n the tracking gets smoother, but there's also more lag between controller motion and the motion of the sphere.

